
NBN Home Internet FAQs
Find answers and solutions about E.Tel NBN Home Internet.
Frequently asked questions
Home Internet Getting Started FAQ
When will my service be up and running?
Your E.Tel Home Internet service will be up and running in as little as 2–5 business days, depending on whether a technician visit is required. We keep you updated every step of the way, so you can enjoy fast and reliable internet sooner!
When will my E.Tel modem arrive if I order one?
If you order an E.Tel modem, it will typically arrive within 3–7 business days. The modem comes pre-configured, making setup quick and easy! You’ll also receive a tracking number so you can monitor its delivery. With E.Tel, you can count on a fast and hassle-free setup.
Can I change my home internet plan?
Absolutely! You can upgrade or change your plan anytime, with changes effective from the next billing cycle. If your household's needs grow, switching to a faster or larger plan is easy with E.Tel. Simply log into your account portal or contact us for assistance.
Will I need an nbn® technician, and what do they do?
A technician may be required if:
- This is your first time connecting to nbn® at your address.
- Additional installation work is needed, such as cabling or setting up the nbn® Connection Box.
The technician will ensure all equipment is properly installed and tested to make sure your service is ready to go. We’ll let you know upfront, and E.Tel ensures everything is ready for your service to perform its best.
Do I need to cancel services with my previous provider?
Not yet! Wait until your E.Tel service is fully activated and we confirm it is working perfectly. Making sure you don’t have downtime, and error is our top priority.
What should I do if I’m moving house?
Moving your internet service to your new home is simple. Contact us with your moving date and new address, and we’ll handle the rest. We’ll help you choose the best plan available at your new location and disconnect your old service on the specified date. Once everything is set up, we’ll confirm your new service details via email.
Home Internet Technical FAQ
What can I do if my internet speed seems slower than usual?
Power Cycling: Restarting your equipment is often the quickest and easiest way to fix slow or spotty internet.
Here's how:
- Turn off your modem or router.
- Unplug the power cord and wait 30 seconds to clear any remaining power.
- Plug the cord back in, turn the equipment back on, and wait for it to reconnect.
- Once you're back online, run a speed test to check your connection.
Router Location: Your router's placement has a big impact on your internet’s performance. Make sure it’s in an open, central spot and away from walls, furniture, and electronics like baby monitors or microwaves, which can interfere with the signal. If you use certain devices more (like for gaming or in a home office), position your router closer to those devices. Run speed tests in different rooms to find the best setup.
BYO Modem: If you’re using a "Bring Your Own" modem that is older than 2 years, it might be affecting your internet speed. Technology evolves quickly, and older modems may not be compatible with the latest network standards. You might want to consider upgrading to an E.Tel modem for optimal performance and compatibility.
What should I do if I have no connection?
Try these quick steps:
- Restart your modem and check the indicator lights.
- Ensure all cables are securely connected.
- Check your email or SMS for any outage notifications from us.
If you’re still offline, contact our support team for troubleshooting assistance.
How can I tell if there's an outage?
Although incredibly rare, we’ll notify you via email and SMS if there’s an outage in your area. If you don’t see any notifications but still have no connection, contact us for troubleshooting support.
What is an nbn® Connection Box (NTD or NCD), and what does it do?
The nbn® Connection Box (also called the NTD or NCD) connects your home to the nbn® network. It acts as the link between the external network and your internal setup, providing Ethernet ports for internet and voice services.
What are the different nbn® connections, and what do they mean?
nbn® uses different technologies depending on your location:
- FTTP (Fibre to the Premises): A full fibre connection offering the fastest speeds.
- FTTN (Fibre to the Node): Fibre runs to a nearby node, with copper used for the last section to your home.
- HFC (Hybrid Fibre Coaxial): Fibre connects to a coaxial cable, often used in areas with existing cable TV infrastructure.
- Fixed Wireless: Internet is delivered wirelessly from a nearby tower to an outdoor antenna installed at your home. This is common in rural or regional areas.
Each type has different speed capabilities. Check your connection type on our website or contact us for details.
Why is my previous modem not working with my new provider?
If your old modem doesn’t work after switching providers, it may be locked to your previous provider or require reconfiguration. Many modems are pre-configured with provider-specific settings, such as PPPoE credentials or VLAN tags.
Check our BYO Modem Setup Guide for instructions on configuring your modem and troubleshooting common issues. If you’re still having trouble, contact our support team for assistance.
How do I know if I’m using the correct UNI-D port on my nbn® Connection Box?
If your home uses an FTTP connection, your nbn® Connection Box will have multiple UNI-D ports (labeled UNI-D 1, UNI-D 2, etc.).
To identify the correct one:
- Look for a green light next to the active port.
- Confirm with us which port is assigned to your service.
If you’re unsure, contact our support team for assistance.
Can I opt out of CGNAT or use a static IP?
Yes, you can request a static IP for an additional $5 per month. Static IPs are great for gaming, remote access, or hosting servers. Contact our support team, and we’ll guide you through the process.
BYO Modem Guide
All Types of Connections
Is your nbn™ activated? If yes, that’s great! The next step is setting up your modem. If you’ve chosen to configure your own, don’t worry—it’s simpler than you might think. This guide will walk you through the process step by step.
Step 1: Check Compatibility
Before starting, ensure your modem/router is compatible with your nbn™ connection type:
- FTTN/FTTB: Requires a VDSL-compatible modem/router.
- FTTP/FTTC/HFC: Requires a WAN-enabled modem/router.
To check your nbn™ connection type, visit the nbn™ website and enter your address. This will provide details about the type of connection available at your property.
If you’re still unsure or have questions about compatibility, feel free to contact our customer support team for assistance.
Step 2: Gather Your Details
You’ll need your unique PPPoE username and password, provided in your activation email.
Step 3: Connect Your Modem Router
For FTTN/FTTB (VDSL2):
- Connect the DSL port on the modem/router to your telephone wall socket.
- Plug the power cable into the modem/router and a power outlet.
For FTTP/FTTC/HFC (WAN):
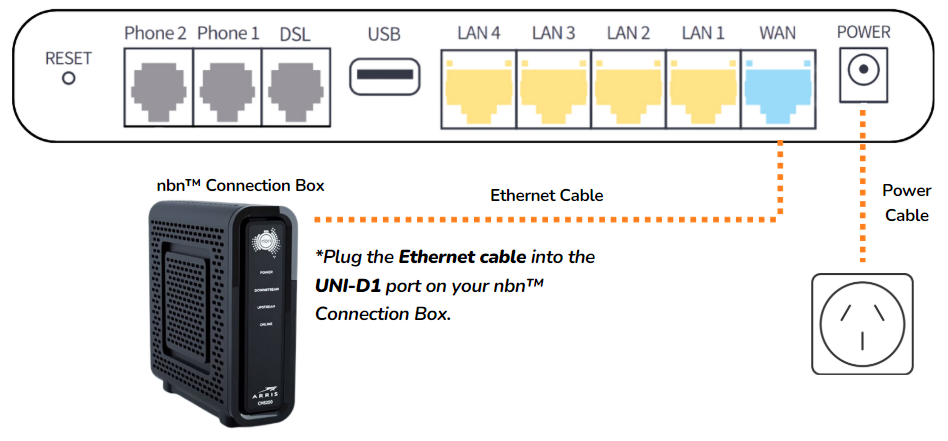
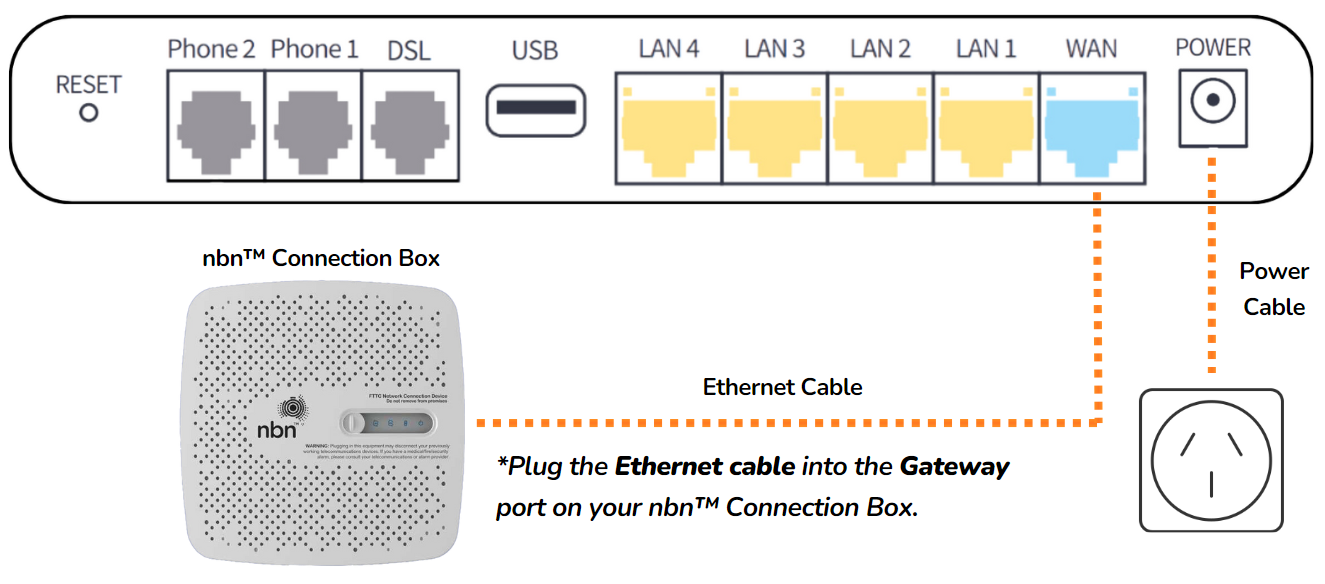
- Connect the UNI-D1 port on the nbn™ Connection Box to the WAN port on your modem/router using an Ethernet cable.
- Plug the power cable into the modem/router and a power outlet.
Step 4: Access the Configuration Page
- Open a web browser (e.g., Chrome, Safari).
- Type the router’s default configuration page address into the address bar. Common addresses include:
- http://192.168.1.1/
- http://192.168.0.1/
- http://routerlogin.net/ (for Netgear routers)
- Check the label on the back of your router if these addresses do not work.
- Log in using the default username and password (usually 'admin/admin' or 'admin/password').
- If the password is incorrect, try searching online by typing your modem model into Google to find the default username and password for that specific model.
- If you’ve forgotten the login details, reset the modem/router by holding the 'Reset' button for 10-15 seconds, then use the default credentials.
Step 5: Enter Your Internet Settings
- Navigate to the 'Internet Setup' or similar section.
- Select 'PPPoE' as the connection type.
- Enter your PPPoE username and password (found in your activation email).
- Save the settings and restart your modem/router.
Step 6: Test and Get Started!
Open a web browser on a connected device and visit a website to confirm that the internet connection is working.
Troubleshooting Tips
Internet is not working after setup
- Ensure all cables are securely connected.
- Double-check your PPPoE username and password.
- Restart your modem/router and nbn™ Connection Box (if applicable).
Forgot modem/router login details
- Reset the modem/router by holding the 'Reset' button for 10-15 seconds.
- Use the default login credentials (usually 'admin/admin' or 'admin/password').
Compatibility issues with modem/router
- Confirm your modem/router supports your nbn™ connection type: VDSL for FTTN/FTTB or WAN-enabled for FTTP/FTTC/HFC.
- Contact customer support for assistance.
Can’t find PPPoE username or password
- Check your activation email for the details.
- Contact customer support if the details are missing or unclear.
If you are still having issues connecting to the internet, please feel free to contact our technical support team here.
Download Setup Guide
You can download the full setup instructions in PDF format by clicking the file below.
E.Tel Modem Guide
Fibre to the Node (FTTN) / Fibre to the Basement (FTTB)
Step 1: Confirm Your Internet is Active
You should have received an SMS from us confirming that your internet service is active. If you haven’t received this message, please wait until you receive it before proceeding with the setup.
Step 2: Unbox Your Modem
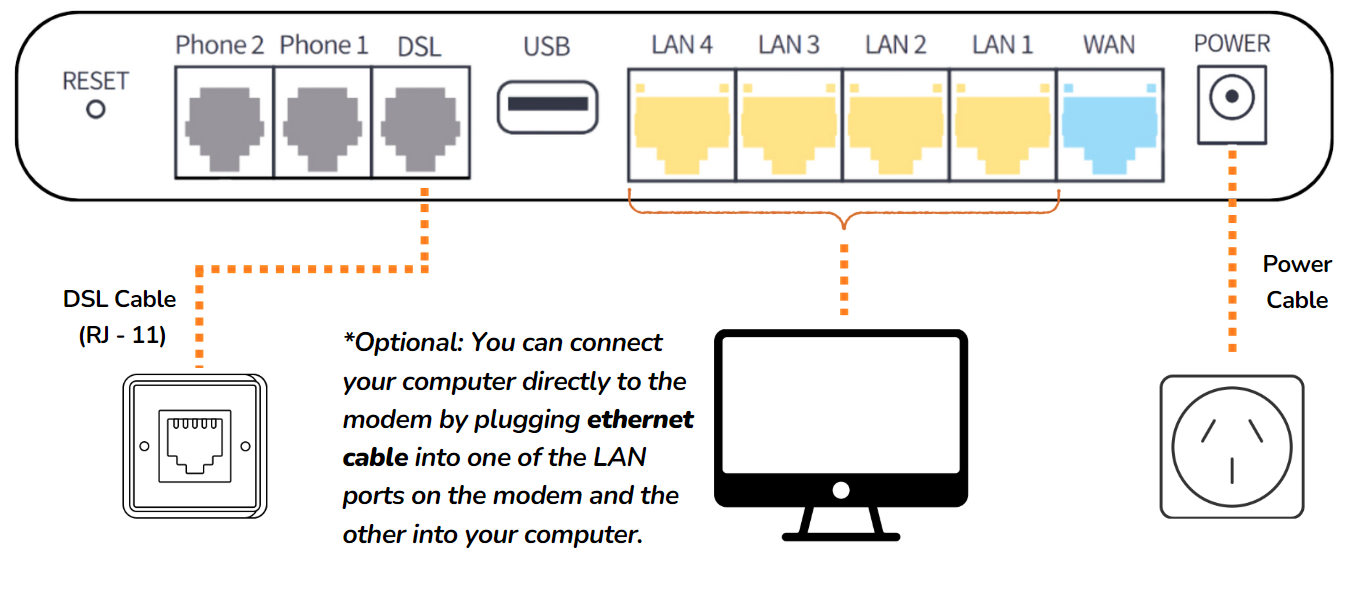
Before starting, make sure you have all items in the box. The cables included are:
- Ethernet Cable (RJ-45)
- DSL Cable (RJ-11)
- Power Cable
Step 3: Set Up Your Modem Connections
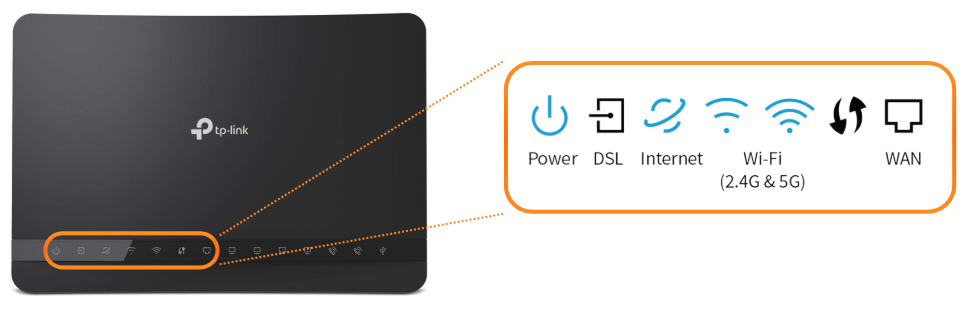
Step 4: Wait 15 Minutes for the Modem to Initialize
After about 15 minutes, you should see Power, Internet, and Wi-Fi lights turn solid blue.
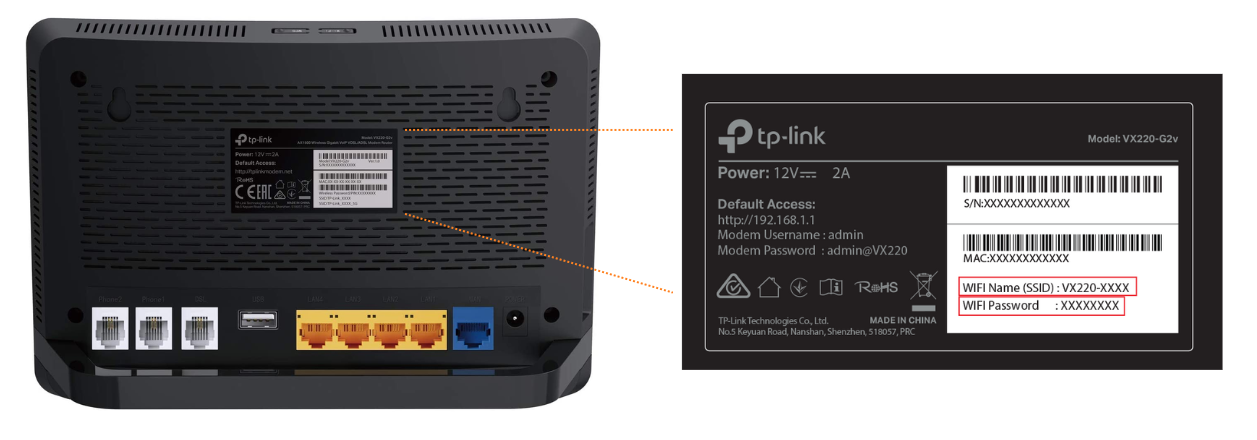
Step 5: Connect Your Devices to Wi-Fi
- Look for the Wi-Fi name (SSID) and password, which can be found on a sticker on the back or bottom of the modem.
- On your device (e.g., smartphone, tablet, or laptop), go to Wi-Fi settings and select the modem's Wi-Fi name.
- Enter the Wi-Fi password when prompted and connect.
Step 6: Test and Get Started!
Open a web browser on a connected device and visit a website to confirm that the internet connection is working.
Troubleshooting Tips
No Blue Light
- Check that the DSL cable is firmly connected to both the modem and the telephone wall socket.
Slow Speeds
- Try moving closer to the modem if you're using Wi-Fi, or consider using an Ethernet cable for a more stable connection.
No Wi-Fi Signal
- Make sure Wi-Fi is enabled on your modem and that your device is within range.
If you are still having issues connecting to the internet, please feel free to contact our technical support team here.
Download Setup Guide
You can download the full setup instructions in PDF format by clicking the file below.
Fibre to the Premises (FTTP) / Fixed Wireless (FW)
Step 1: Confirm Your Internet is Active
You should have received an SMS from us confirming that your internet service is active. If you haven’t received this message, please wait until you receive it before proceeding with the setup.
Step 2: Unbox Your Modem
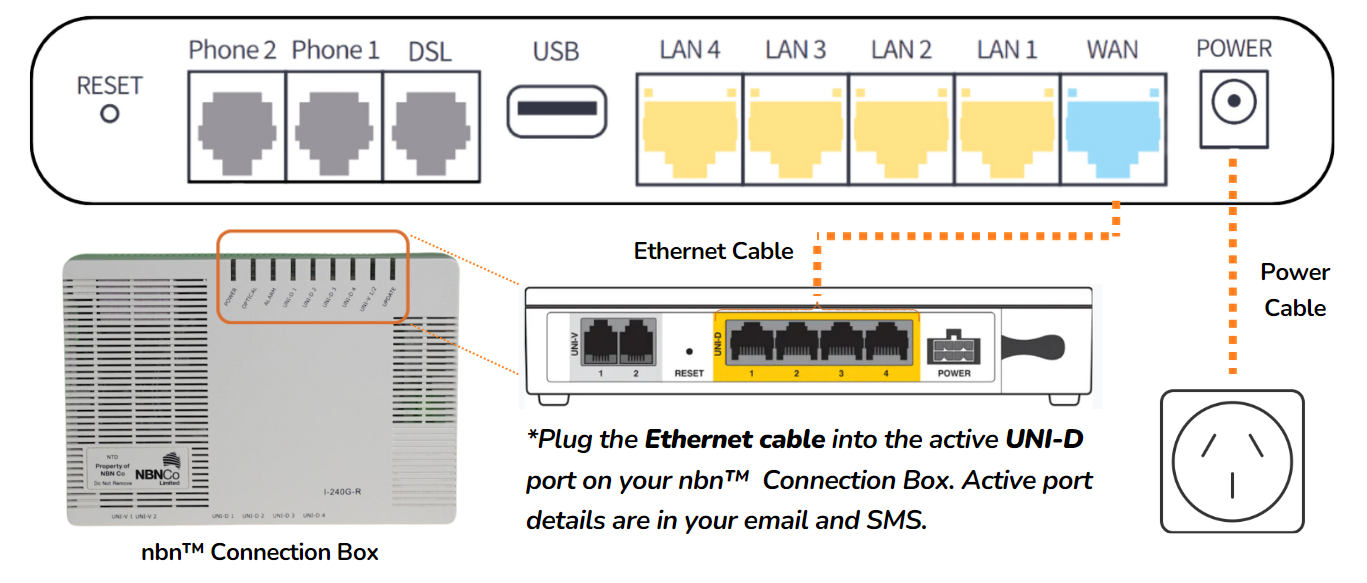
Before starting, make sure you have all the necessary cables:
- Ethernet Cable (RJ-45)
- Power Cable
* Note: You will also receive DSL Cable in the box, but you won’t need this for your setup.
Step 3: Set Up Your Modem Connections
Step 4: Wait 15 Minutes for the Modem to Initialize
After about 15 minutes, you should see Power, Internet, and Wi-Fi lights turn solid blue.
Step 5: Connect Your Devices to Wi-Fi
- Look for the Wi-Fi name (SSID) and password, which can be found on a sticker on the back or bottom of the modem.
- On your device (e.g., smartphone, tablet, or laptop), go to Wi-Fi settings and select the modem's Wi-Fi name.
- Enter the Wi-Fi password when prompted and connect.
Step 6: Test and Get Started!
Open a web browser on a connected device and visit a website to confirm that the internet connection is working.
Troubleshooting Tips
No Blue Light
- Check that the DSL cable is firmly connected to both the modem and the telephone wall socket.
Slow Speeds
- Try moving closer to the modem if you're using Wi-Fi, or consider using an Ethernet cable for a more stable connection.
No Wi-Fi Signal
- Make sure Wi-Fi is enabled on your modem and that your device is within range.
If you are still having issues connecting to the internet, please feel free to contact our technical support team here.
Download Setup Guide
You can download the full setup instructions in PDF format by clicking the file below.
Hybrid Fibre Coaxial (HFC)
Step 1: Confirm Your Internet is Active
You should have received an SMS from us confirming that your internet service is active. If you haven’t received this message, please wait until you receive it before proceeding with the setup.
Step 2: Unbox Your Modem
Before starting, make sure you have all the necessary cables:
- Ethernet Cable (RJ-45)
- Power Cable
* Note: You will also receive DSL Cable in the box, but you won’t need this for your setup.
Step 3: Set Up Your Modem Connections
Step 4: Wait 15 Minutes for the Modem to Initialize
After about 15 minutes, you should see Power, WAN/DSL, Internet, and WLAN lights turn solid blue.
Step 5: Connect Your Devices to Wi-Fi
- Look for the Wi-Fi name (SSID) and password, which can be found on a sticker on the back or bottom of the modem.
- On your device (e.g., smartphone, tablet, or laptop), go to Wi-Fi settings and select the modem's Wi-Fi name.
- Enter the Wi-Fi password when prompted and connect.
Step 6: Test and Get Started!
Open a web browser on a connected device and visit a website to confirm that the internet connection is working.
Troubleshooting Tips
No Blue Light
- Check that the DSL cable is firmly connected to both the modem and the telephone wall socket.
Slow Speeds
- Try moving closer to the modem if you're using Wi-Fi, or consider using an Ethernet cable for a more stable connection.
No Wi-Fi Signal
- Make sure Wi-Fi is enabled on your modem and that your device is within range.
If you are still having issues connecting to the internet, please feel free to contact our technical support team here.
Download Setup Guide
You can download the full setup instructions in PDF format by clicking the file below.
Fibre to the Curb (FTTC)
Step 1: Confirm Your Internet is Active
You should have received an SMS from us confirming that your internet service is active. If you haven’t received this message, please wait until you receive it before proceeding with the setup.
Step 2: Unbox Your Modem
Before starting, make sure you have all the necessary cables:
- Ethernet Cable (RJ-45)
- Power Cable
* Note: You will also receive DSL Cable in the box, but you won’t need this for your setup.
Step 3: Set Up Your Modem Connections
Step 4: Wait 15 Minutes for the Modem to Initialize
After about 15 minutes, you should see Power, WAN/DSL, Internet, and WLAN lights turn solid blue.
Step 5: Connect Your Devices to Wi-Fi
- Look for the Wi-Fi name (SSID) and password, which can be found on a sticker on the back or bottom of the modem.
- On your device (e.g., smartphone, tablet, or laptop), go to Wi-Fi settings and select the modem's Wi-Fi name.
- Enter the Wi-Fi password when prompted and connect.
Step 6: Test and Get Started!
Open a web browser on a connected device and visit a website to confirm that the internet connection is working.
Troubleshooting Tips
No Blue Light
- Check that the DSL cable is firmly connected to both the modem and the telephone wall socket.
Slow Speeds
- Try moving closer to the modem if you're using Wi-Fi, or consider using an Ethernet cable for a more stable connection.
No Wi-Fi Signal
- Make sure Wi-Fi is enabled on your modem and that your device is within range.
If you are still having issues connecting to the internet, please feel free to contact our technical support team here.
Download Setup Guide
You can download the full setup instructions in PDF format by clicking the file below.